|
26 |
FM-7 ROM吸出し器の製作 (2) |
ArduinoとPCはUSBケーブルで接続し、それを通じてプログラムするのですが、そのケーブルを通じて通信することができます。具体的にはArduino側でprintln()関数を実行すると、PC側でArduino IDEの機能であるシリアルモニターを立ち上げておけば、データを表示することができるので、これを利用します。ちなみに、Arduino IDEの機能であるシリアルプロッターという便利なものがあり、Arduino側でデータを出力すれば、IDE側でグラフをリアルタイムで書いてくれ、オートスケールまでしてくれます。
面倒なのはArduino側で並列データの概念が無く、bitの入出力しかないため、アドレスのライトはbitに分解し、データのリードはbitを統合してやる必要があることです。以下にパラシリ、シリパラ変換を示します。
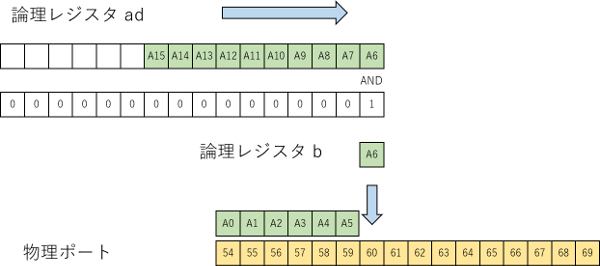
16ビットアドレスの分解(パラ⇒シリ)
int apb = 54;
boolean b;
unsigned address = 0x8000;
unsigned ad;
:
ad = address;
for (int i = 0; i < 16; i++) {
b = ad & 1;
digitalWrite(apb+i, b);
ad = ad >> 1;
}
このコードの動作図を図157.1に示します。
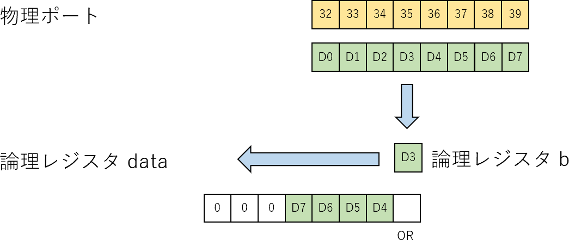
8ビットデータの組み上げ(シリ⇒パラ)
int dpb = 39;
boolean b;
unsigned data;
:
data = 0;
for (int i = 0; i < 8; i++) {
data = data << 1;
b = digitalRead(dpb-i);
data = data | b;
}
このコードの動作図を図157.2に示します。

Leave a Comment